
Introduction
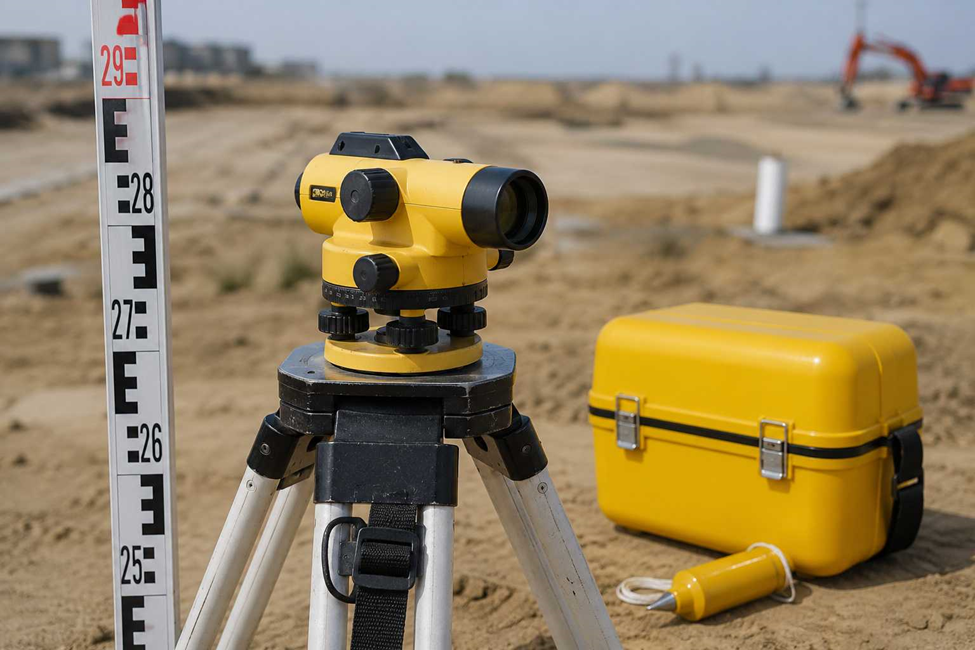
A dumpy level is one of the most widely used surveying instruments for measuring differences in elevation and establishing accurate level points. It is a simple, durable, and highly reliable tool used in construction, road development, drainage projects, and land surveying. Despite the availability of modern surveying technologies, the dumpy level remains an essential instrument because of its accuracy and ease of use. In this guide, you’ll learn what a dumpy level is, its parts, uses, setup procedure, and how it compares with other surveying instruments.
What is a Dumpy Level?
A dumpy level is a surveying instrument used to measure and compare heights (elevations) of different points on the ground. It has a short, rigid telescope mounted on a tripod that stays level, allowing surveyors to take accurate horizontal sightings.
Main Parts:
- Telescope – for sighting the leveling staff
- Bubble tube (spirit level) – ensures the instrument is perfectly level
- Leveling/foot screws – used to adjust and level the instrument
- Tripod stand – supports and stabilizes the instrument
- Trivet stage – connects the instrument head to the tripod
Main Uses:
- Finding the difference in elevation between two or more points
- Setting out level foundations for buildings
- Checking ground levels for roads, plots, and drainage systems
- Transferring levels across a construction site
How to Set Up a Dumpy Level on Site
Step 1: Choose the Station
Pick firm, stable ground with a clear view of the points you need to level. Avoid soft soil or areas with vibration nearby (moving vehicles, machinery).
Step 2: Fix the Tripod
Spread the tripod legs to a comfortable working height, roughly chest level for the observer. Push the legs firmly into the ground so the tripod head sits level by eye.
Step 3: Mount the Instrument
Screw the dumpy level onto the tripod head using the centering screw. Don’t overtighten — just enough to hold it steady.
Step 4: Rough Leveling
Using the three foot screws, bring the circular (bull’s-eye) bubble to the center. Adjust two screws together, then the third, until the bubble sits dead center.
Step 5: Precise Leveling
Turn the telescope so it’s parallel to two foot screws. Center the tubular bubble by turning those two screws in opposite directions. Rotate the telescope 90° and repeat with the third screw. Go back and check the first position again — repeat until the bubble stays centered in both positions.
Step 6: Eliminate Parallax
Point the telescope at a bright surface, adjust the eyepiece until the crosshairs appear sharp, then focus the objective lens on the staff. Move your eye slightly up and down — if the crosshair doesn’t shift against the staff image, parallax is removed.
Step 7: Take the Reading
Sight the leveling staff held at the point to be measured. Read the value where the horizontal crosshair cuts the staff.
Step 8: Check Before Moving
Before shifting station, verify the bubble is still centered. If it’s drifted, re-level and take the reading again.
Applications of the Dumpy Level
1. Construction Layout & Site Control
Used to establish reference points, fix benchmarks, and transfer design elevations from drawings onto the actual site — critical for accurate foundation, column, and wall levels.
2. Elevation & Height Difference Measurement
The core function of the instrument: taking back sight and fore sight readings to work out the exact height difference between two or more points on site.
3. Grading, Drainage & Surface Leveling
Widely used to check slopes for roads, canals, pipelines, and building pads — ensuring water drains correctly and surfaces are graded to design levels.
4. Topographic Surveying
Helps build elevation profiles and contour data of a plot by taking systematic level readings across the land before design work begins.
5. Road & Infrastructure Alignment
Supports gradient and alignment control for roads, railway tracks, and drainage lines, keeping infrastructure work within planned tolerances.6. Landscaping & Irrigation Layout
Used to level terraces, garden beds, and irrigation channels — important for proper water flow and even distribution in landscaping or agricultural projects.
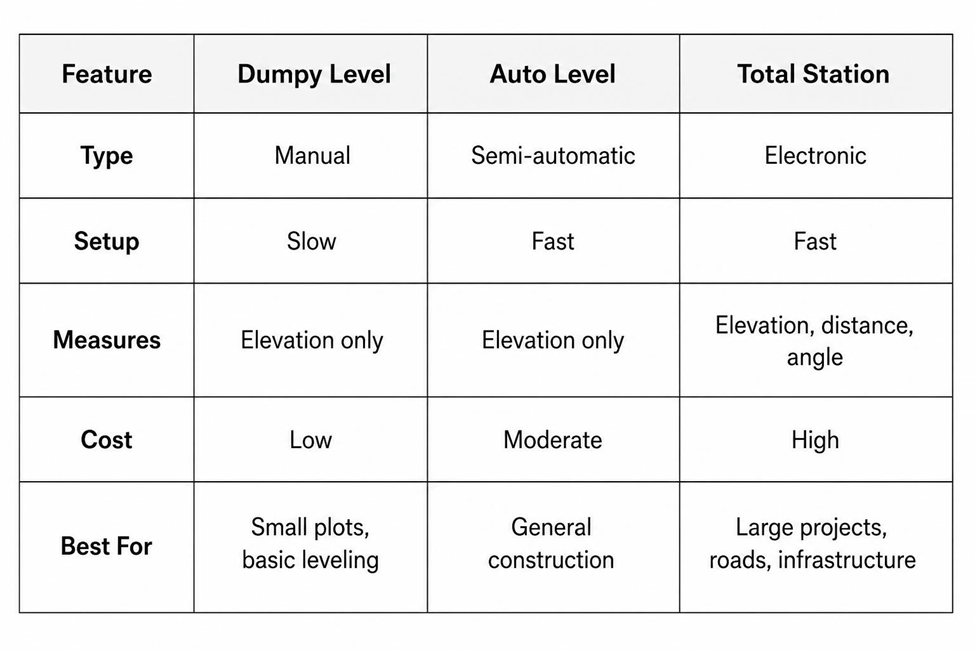
Dumpy Level vs Auto Level vs Total Station
Parts of a Dumpy Level and Their Functions
Telescope – Used to sight the leveling staff and take readings. Has crosshairs for aligning on the exact point.
Eyepiece – Where you look through; focused to make the crosshairs appear sharp and clear.
Objective Lens – Focuses the image of the staff so it’s visible through the telescope.
Bubble Tube (Spirit Level) – A curved glass tube with liquid and an air bubble; centering it confirms the telescope’s line of sight is truly horizontal.
Circular Bubble (Bull’s-Eye Level) – Used for rough leveling before fine adjustment with the tubular bubble.
Foot Screws (Leveling Screws) – Three screws used to level the instrument by raising or lowering different sides of the leveling head.
Leveling Head – The base plate that holds the foot screws and connects the instrument to the tripod.
Tribrach/Trivet Stage – Sits between the leveling head and tripod, allowing the instrument to be centered and locked in place.
Vertical Spindle – The axis the telescope rotates around when turning it horizontally.
Tripod – Supports the entire instrument at a working height and keeps it stable on the ground.
Plumb Bob (optional attachment) – Hangs below the instrument to center it precisely over a survey point/station mark.
How to Calculate Reduced Levels (RL) Using a Dumpy Level:
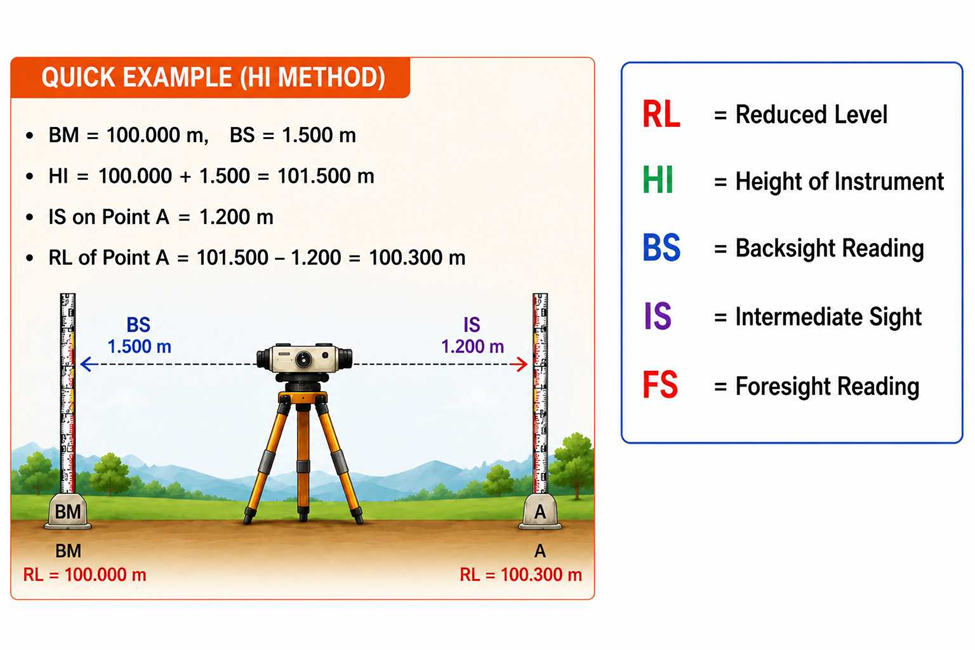
Reduced Level (RL) is the elevation of a point relative to a fixed reference point called a Benchmark (BM) — usually taken as a known height, like 100.000m.
There are two common methods:
1. Height of Instrument (HI) Method
Step 1: Take a Back Sight (BS) reading on the benchmark.
Step 2: Calculate Height of Instrument:HI = RL of BM + BS
Step 3: Take Intermediate Sight (IS) or Fore Sight (FS) readings on other points.
Step 4: Calculate RL of each point:RL = HI − IS (or FS)
Step 5: When shifting the instrument to a new station, take a Fore Sight on the last point (turning point), calculate new HI, then continue.
2. Rise and Fall Method
Step 1: Compare each staff reading with the previous one.
Step 2: If the current reading is smaller than the previous → Rise (ground goes up)
If the current reading is larger than the previous → Fall (ground goes down)
Step 3: Calculate:Rise/Fall = Previous Reading − Current Reading
Step 4: Apply to previous RL:RL = Previous RL + Rise (or − Fall)
Quick Example (HI Method)
- BM = 100.000m, BS = 1.500m
- HI = 100.000 + 1.500 = 101.500m
- IS on Point A = 1.200m
- RL of Point A = 101.500 − 1.200 = 100.300m
Check/Arithmetic Check:Sum of BS − Sum of FS = Last RL − First RL
Frequently Asked Questions (FAQs)
1. What is a dumpy level used for?
A dumpy level is used to measure differences in elevation between two or more points. It is commonly used for construction, road projects, drainage works, foundation leveling, and land surveying.
2. What is the difference between a dumpy level and an auto level?
A dumpy level requires manual leveling using foot screws and a spirit bubble, while an auto level has an internal compensator that automatically maintains a horizontal line of sight, making it faster and easier to use.
3. How accurate is a dumpy level?
A properly calibrated dumpy level can provide highly accurate elevation measurements. Its accuracy depends on the instrument’s quality, correct setup, and the surveyor’s operating technique.
4. How do you calculate Reduced Level (RL) using a dumpy level?
Reduced Level (RL) is calculated using the Height of Instrument (HI) or Rise and Fall method. Surveyors use benchmark elevations and staff readings to determine the elevation of each survey point accurately.
5. What are the main parts of a dumpy level?
The main parts of a dumpy level include the telescope, objective lens, eyepiece, bubble tube, circular bubble, leveling screws, leveling head, tripod, and trivet stage. Each component helps ensure accurate leveling and measurement.
6. Is a dumpy level still used in modern surveying?
Yes. Although advanced instruments such as Total Stations and GNSS receivers are widely used, dumpy levels remain a reliable and cost-effective choice for leveling work, foundation checks, road construction, and site grading where accurate elevation measurements are required.
Conclusion
The dumpy level continues to be a trusted surveying instrument for accurate leveling and elevation measurement. Its simple design, dependable performance, and cost-effectiveness make it a valuable tool for a wide range of construction and engineering projects. By understanding its components, proper setup, and leveling methods, surveyors can collect precise field data and improve the quality and accuracy of every project.
Accurate Survey Work L.L.C. (ASW Abu Dhabi) provides professional land surveying solutions for construction, infrastructure, and engineering projects across the UAE. Using high-precision dumpy levels, Total Stations, GNSS, and the latest surveying technology, our experienced surveyors deliver accurate, reliable, and project-ready data to support every stage of construction. Contact our team today to discuss your surveying requirements.
References
For more information about dumpy levels and surveying equipment, you can visit these trusted sources:
- Leica Geosystems – https://leica-geosystems.com

Pingback: Dumpy Level vs Auto Level: What Actually Changes on Site Dumpy Level vs Auto Level: Which One Suits Your Site? - Accurate Survey Work LLC